Event Planning Software Tutorial for Beginners: Getting Started with Ripluo
In This Tutorial
Getting started with event planning software can feel overwhelming, but it does not have to be. This step-by-step guide walks you through everything you need to know to set up your Ripluo account, explore the dashboard, and plan your first event - whether it is a corporate conference, a wedding, or a 5K charity run.
Step 1: Creating Your Account
Head to ripluo.com and click "Start Planning with Ripluo." You will be asked to fill in a few quick fields:
- Your first and last name
- Your email address
- A password (you will confirm it)
You will also set up your Account URL - a unique link for your organization. This is useful when sharing your account with team members or clients. You can change it later, so do not overthink it. Click "Create Account" and you are in.
Step 2: Navigating the Dashboard
Once you are logged in, you will land on your dashboard. Here is a quick tour of what you will see:
- Left sidebar - Your main menu with different sections. Some are available on the free plan; others unlock with a paid account.
- Active Events - Shows how many events you currently have. Free accounts can manage up to 5 active events.
- Pending Tasks - A quick view of outstanding to-dos across all your events.
- Open Opportunities - For paid accounts, this ties into the CRM. You can see leads, pipelines, and proposals at a glance.
- Vendor Quotes - If you have collected quotes from vendors (DJs, caterers, florists, etc.), they show up here.
You will also see "My First Event" - a sample event that Ripluo creates automatically so you can explore the tools without starting from zero.
Step 3: Choosing Your Event Tools
Click into your sample event and you will notice the left sidebar changes to show event-specific tools. These are your planning essentials:
- Event Details - Always visible. This is your event overview: name, date, venue, expected headcount, and planning stage.
- Event Schedule - Your agenda or run of show. This is always active as well.
- Checklists - Task lists for tracking everything that needs to get done.
- Notes - Free-form space for meeting notes, ideas, and reminders.
- Budget - Track expenses, vendor costs, and overall spend.
- Team - Invite collaborators to edit the event with you (paid accounts).
- Vendors - Manage vendor contacts, contracts, and communications.
- Messages - In-app messaging about specific events (paid accounts).
- Settings - Control who can see financial details like budgets and vendor payments.
Scroll to "All Tools" at the bottom of the sidebar to turn features on or off. For example, if your event does not have sponsors, turn that off. If you do not need a public page yet, hide it. You can always turn them back on later.
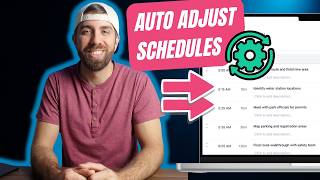
How Dynamic Schedules Work
One of Ripluo's most useful features is dynamic scheduling. When you edit one moment on your schedule, everything that follows automatically adjusts.
For example, the sample event includes a schedule running from 9:00 AM to 5:00 PM. If you change "Welcome and Registration" from 30 minutes to 45 minutes and hit save, every subsequent time block shifts forward automatically. No need to manually update every line - Ripluo handles it for you.
Step 4: Using Buildr AI to Generate Schedules
Do not have a schedule ready? No problem. Buildr AI can create one for you in seconds.
Here is how to use it:
- Open your event and go to Event Schedules (or Checklists or Budget).
- Click the Buildr AI section.
- Choose a prompt type - for example, "During Event Schedule."
- Describe your event. Example: "Create a during-event schedule for a 5K for 500 people with sponsors and volunteers."
- Click Send and let Buildr AI work its magic.
In moments, you will have a detailed, ready-to-use timeline loaded directly into your event. You can edit, expand, or collapse sections as needed. Buildr AI also works for generating checklists and budgets - so you never have to start from a blank page.
Step 5: Creating a New Event
Ready to create your own event? Click "+ New Event" in the top right corner of your dashboard. You will see a window with two options:
Option A: Use Buildr AI
This is the default tab when you open the Create New Event window. Describe your event in plain language and Buildr AI will set it up for you.
- Type a description of your event in the text box. For example: "I'm planning a 200-person corporate gala on June 15th at the downtown convention center. Budget is $50k. Need cocktail hour, dinner, and live entertainment."
- Buildr AI will suggest event details based on your description - you will see options appear below.
- Select the suggestion that fits best, or click "Improve prompt" to refine it.
- Click "Create" and Ripluo will generate your event with the details pre-filled.
This is the fastest way to get started - Buildr AI handles the setup so you can jump straight into planning.
Option B: Create Myself
Prefer to fill everything in manually? Click the "Create Myself" tab at the top of the window.
- Fill in the basics:
- Event name (e.g., "The Ripluo 5K")
- Start from a template or create from scratch
- Event type (e.g., 5K, wedding, corporate event)
- Start and end dates and times
- Budget (optional)
- Description (optional)
- Click "Create Event" and you are ready to go.
From there, you can customize everything - add a cover image, change the banner color, input your venue details, and start building out your schedule, checklist, and budget.
Step 6: Configure Your Event Settings
Once your event is created, click Event Details in the left sidebar to open your event overview. This is where you make the event yours:
- Upload a cover image or change the banner color to match your brand or event theme
- Add your venue name and address so your team always knows where things are happening
- Set the planning stage (e.g., Planning, Pending, On Track, Completed) to keep everyone aligned on where things stand
- Write a short event description that gives your team the quick context they need
These details appear across your workspace and on any Public Pages you create later, so it is worth filling them in now rather than coming back to it.
What You Learned
In this tutorial, you covered the six essential steps to getting started with Ripluo:
- How to create your account and set up your organization URL
- How to navigate the dashboard and understand the key sections
- How to customize your event tools by turning features on and off
- How to use Buildr AI to auto-generate schedules, checklists, and budgets
- How to create an event using Buildr AI or manually from scratch
- How to configure event settings like cover images, venue details, and planning stages
Get Started for Free
Ready to try it yourself? Create your free Ripluo account and start planning your next event today. Free accounts include up to 5 active events - no credit card required.